Categories
EME Hacks

How to make your first EME contact using Remote Ham Radio – Part 2

In part 1 I have described how to setup your RHR account your Mac in order to try EME contacts. This time I will explain some of the operational challenges that you need to understand in order to be successful.

Be advised that I am far from being an expert. In fact I am precisely the opposite as, at the time of this writing, I have logged a total of just 8 valid EME contacts. Still I believe this might be useful to some: If made an EME contact, so can you!

Finding the Moon

This might be unsurprising but in order to do EME contacts you need the moon to be visible. Having no Moon in the sky feels exactly like having no propagation on 20 meters. You just have to wait.

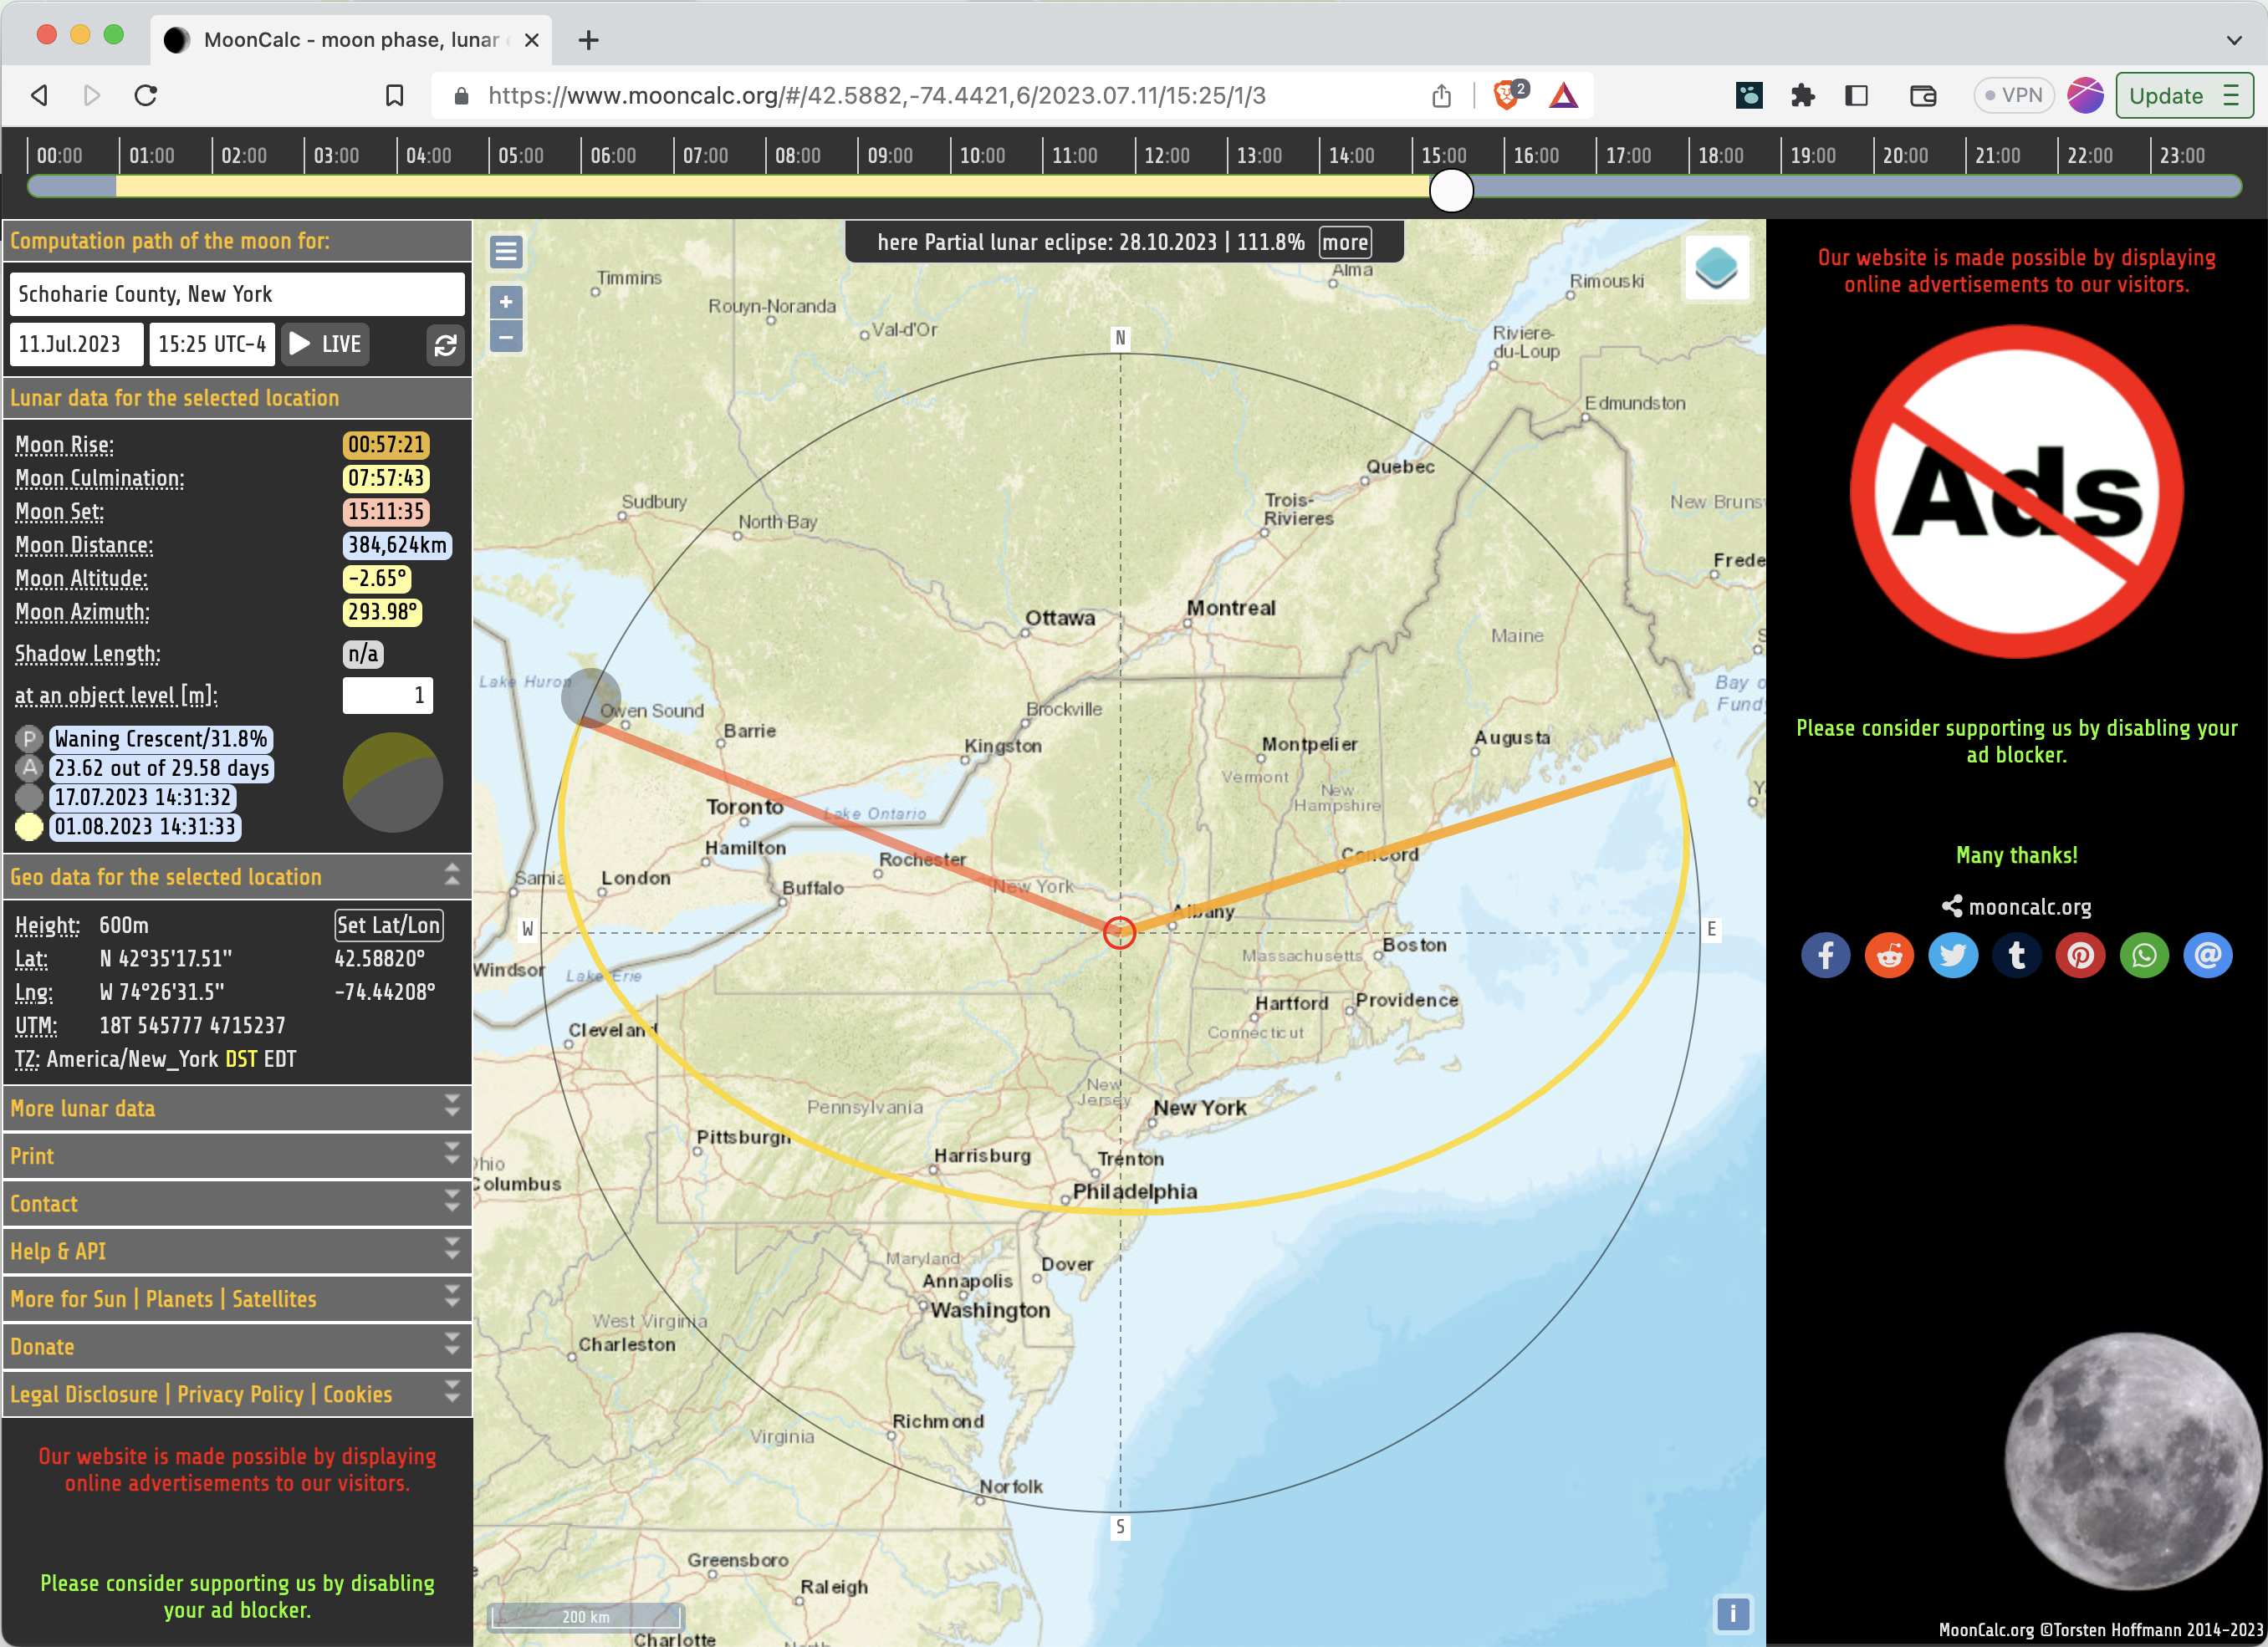
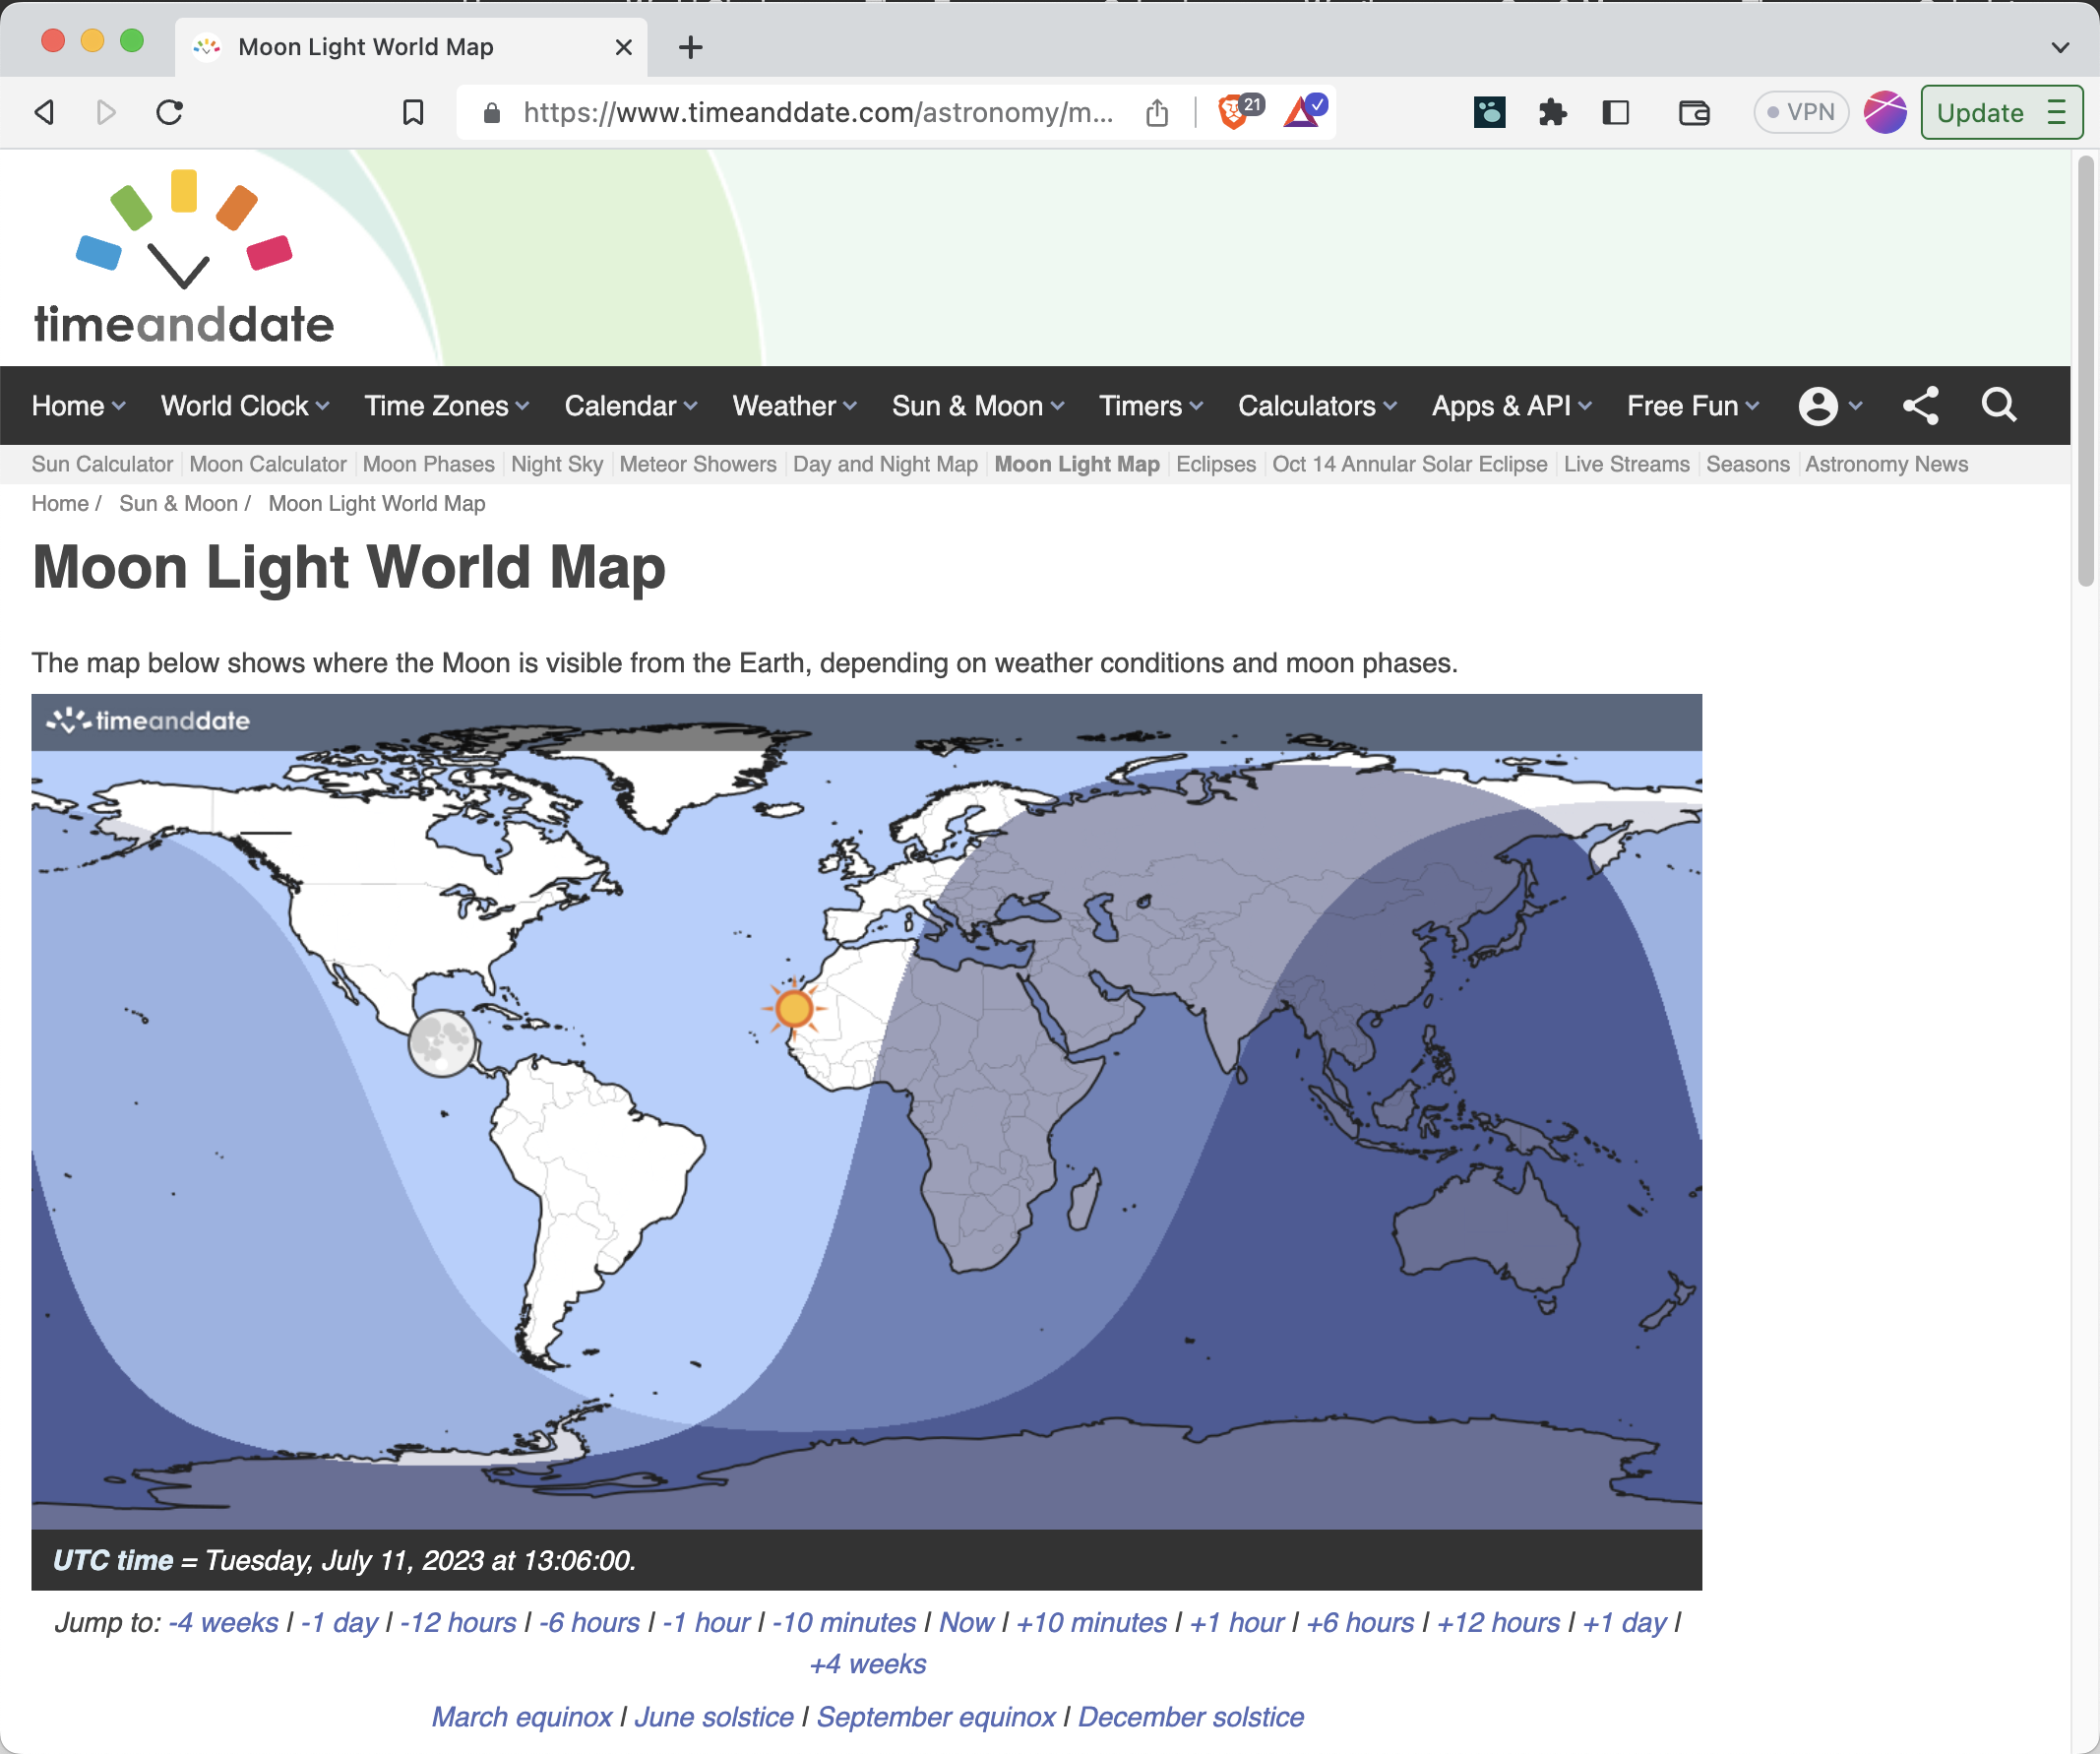
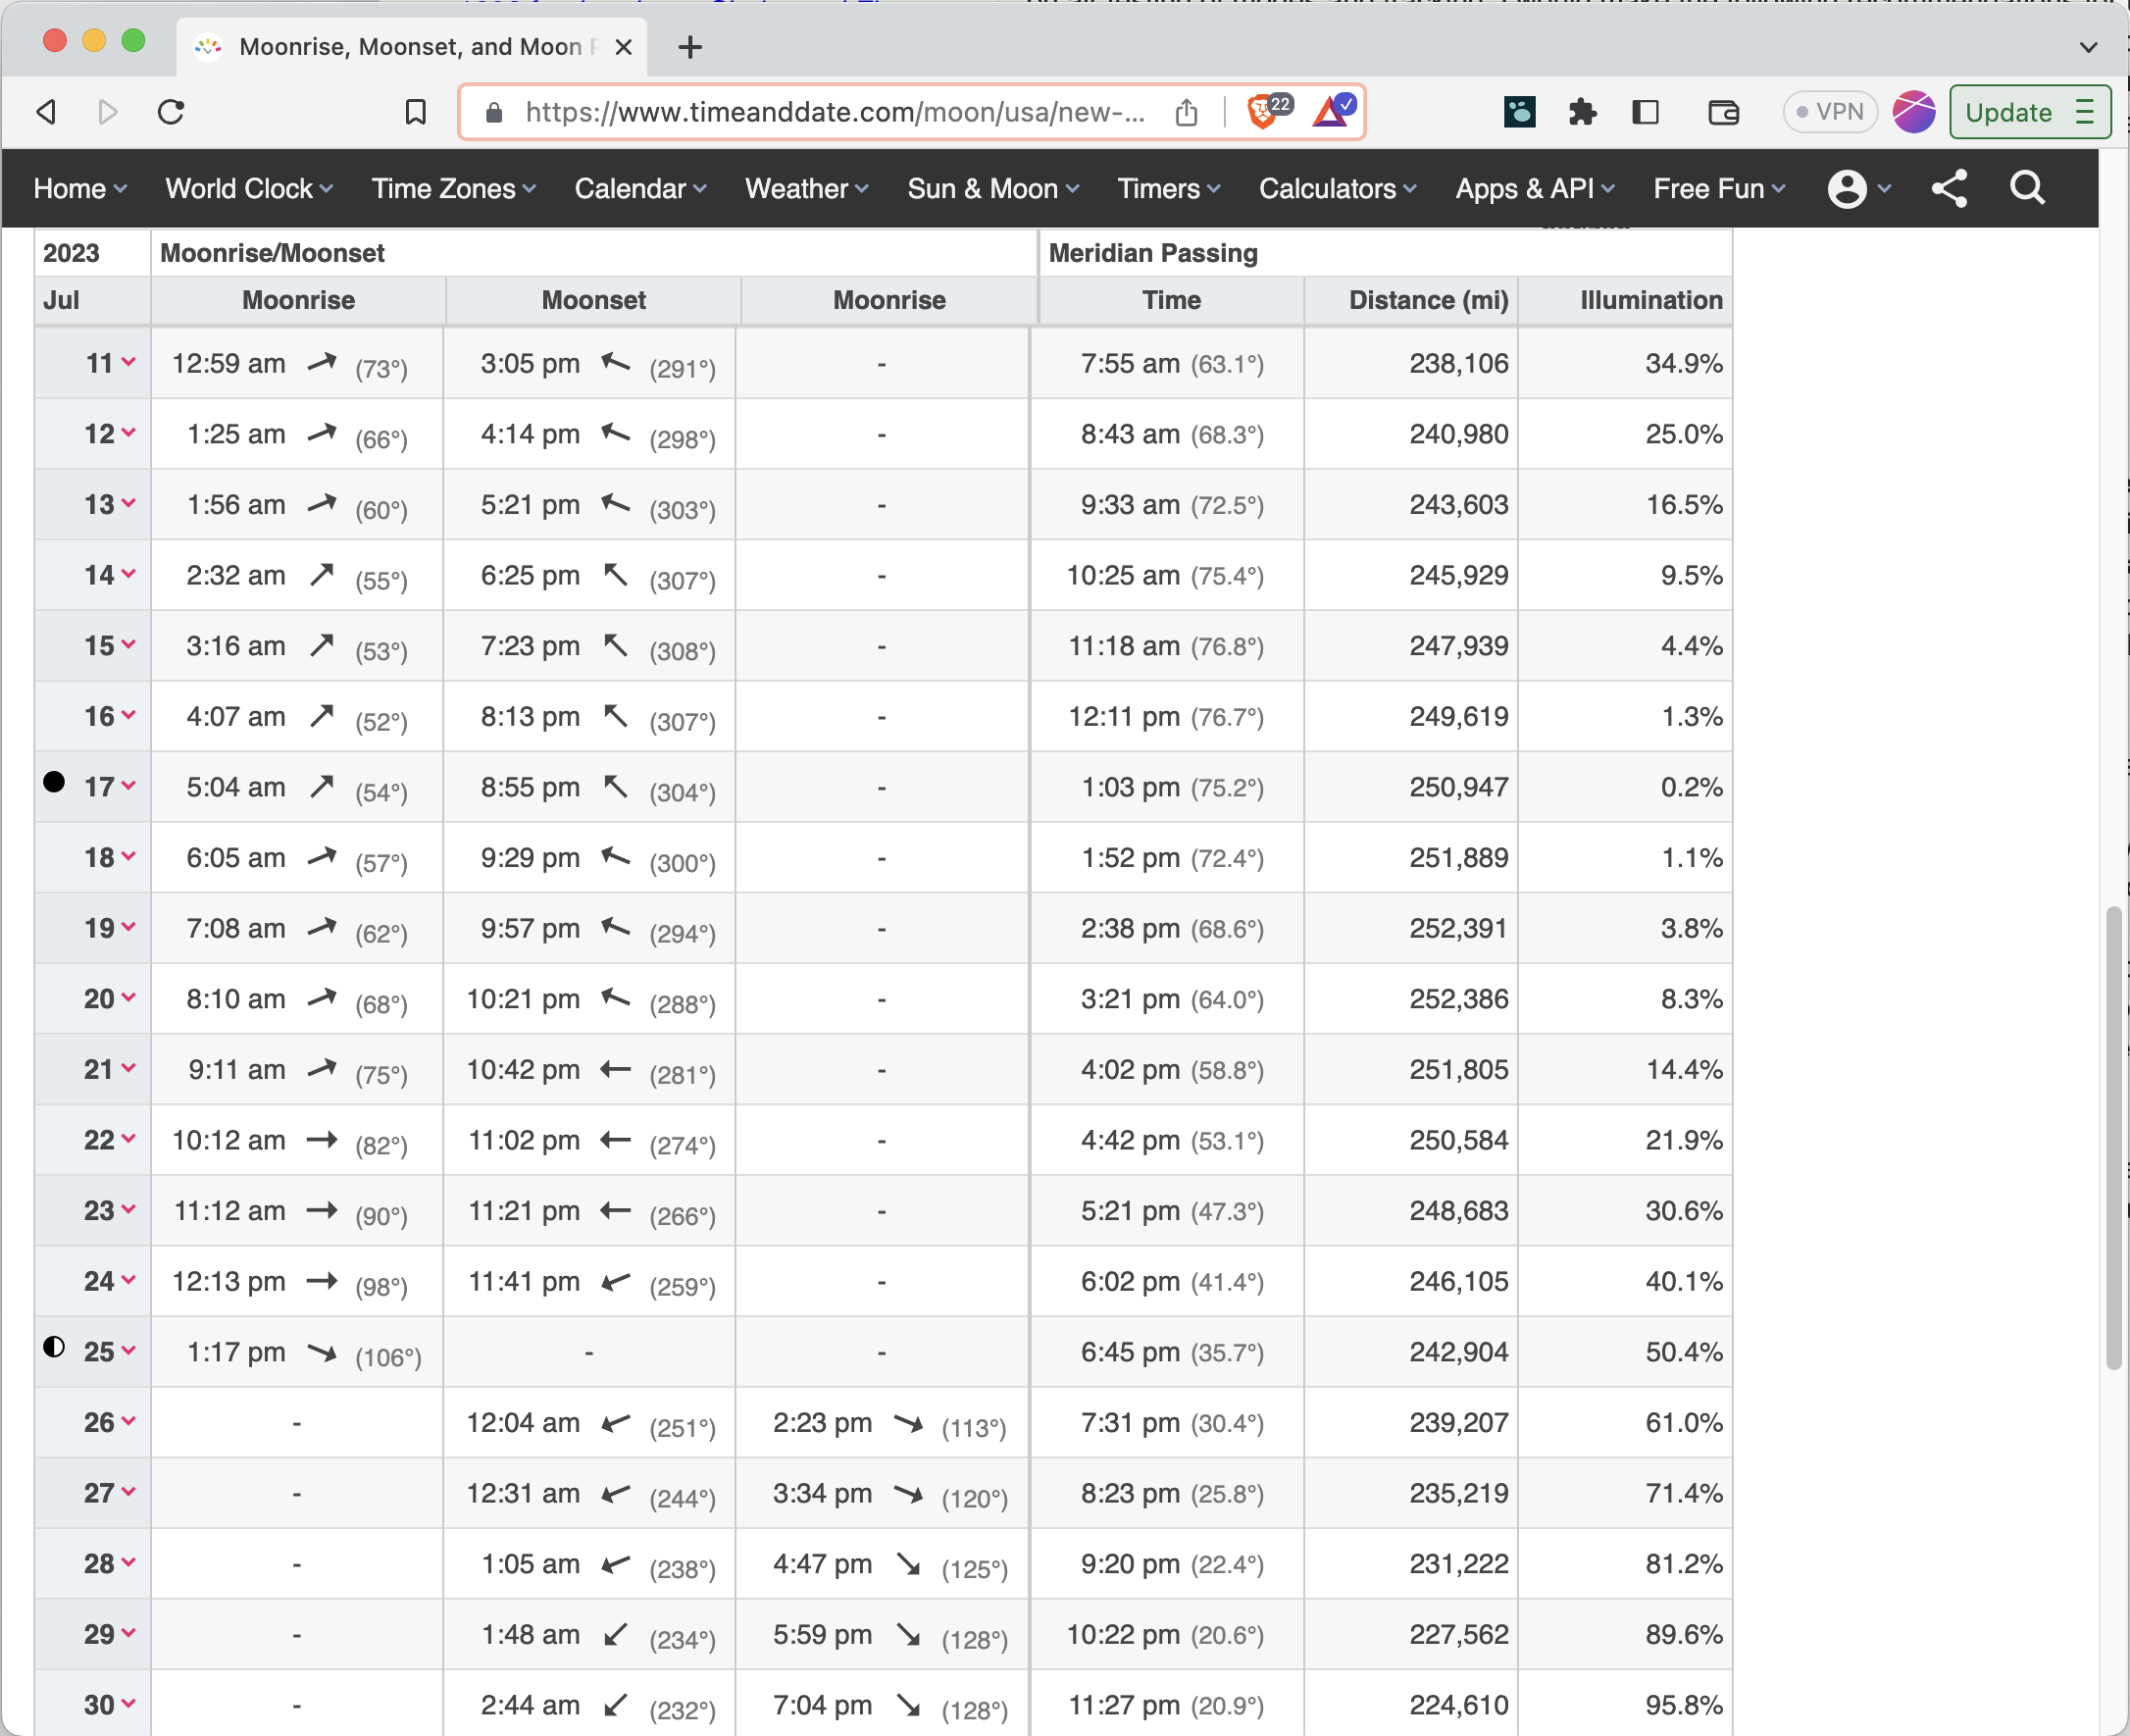
Some great tools to predict Moon visibility are mooncalc.org and timeanddate.com.

Both website are useful to determine the Moon direction and elevation as well as its distance from the Earth. Distance plays a big role in this: having the Moon at “just” 360000 Kilometers is much better than having it at 405000 Kilometers, for obvious reasons. More simply, you might end up using those sites (or similar others) to predict when the Moon availability is compatible with schedule.

Please note that WSJT-X can display some of the same info within its “Astronomical Data” window however I still like to use these websites as I find them more accessible and useful.

Mooncalc.org is useful to display realtime Moon parameters.
Timeanddate.org’s Table function can be used to predict Moonrise/Moonset times as well as Moon Distance.

Pinging the Moon

Before you go into action – especially if it is your very first attempt – you might want verify if you can receive your own echos bouncing off the Moon.

Doing this test is relatively easy as WSJT-X has a specific mode called “Echo” just for that purpose. The documentation goes in depth in explaining how the mode works so you can refer to it.

In a nutshell: with your station ready to go on a clear frequency, select the “Echo” mode and click on “Enable TX”. Pinging will begin immediately. VHF does not require Doppler correction at the Rig level so you cal leave Doppler Tracking on the Astronomical Data Window unchecked.

Here is a successful example:

As per the documentation, the reply quality is represented in the Q column on a scale from 0 (no echo) to 10 (perfect echo).

Echos won’t always come back from the moon. That might indicate a problem with your setup (is power being actually transmitted? is the antenna pointed towards the moon? is the RX chain working properly? the list could be long…) or it could also indicate – as they say – poor “Moon conditions“.

Next Page

Categories
EME Hacks

How to make your first EME contact using Remote Ham Radio – Part 1

Original Picture By Gregory H. Revera, CC BY-SA 3.0

Introduction

Ever since I embarked on my journey in Amateur Radio, I have always regarded EME as the pinnacle of the hobby. The concept of bouncing signals off the Moon held a tremendous allure, but the immense distance, substantial link budget, and the requirement for massive antennas made it seem completely unattainable.

However, over the years, moonbounce has become increasingly accessible. The proliferation of digital modes has enabled ordinary hams to achieve Earth-Moon-Earth contacts even with relatively modest setups. You no longer need an antenna that would grace the front cover of a magazine to engage with the moon.

More recently Remote Ham Radio mada available a quite decent EME station for anyone to utilize. Consequently, if you wish to try EME today, all you need is your laptop. Pretty neat, isn’t it?

Before we move on, let me clarify two things:

  1. This is intended for Mac users. If you use Windows… I’m sorry!
  2. Remote Ham Radio isn’t sponsoring me in any way. I actually paid with my own money in order to use their service and research its functionalities. But… hey I did for science so that’s OK. I also did for fun. Actually, I did it just for fun. Whatever… let’s get into it!

Cost

Remote Ham Radio is a company that offers some kind of an “Amateur Radio as a Service” model. The concept is simple: they build powerful stations and you paid to use them. One of their stations – called Jefferson – is EME VHF capable.

Jefferson has an array of 4×16 elements Yagis and a 1KW amplifier. This is far from being a Big Gun in the world of EME, but is definitely enough to make a lot of contacts. Using the station currently costs $0.79 per minute + membership fee ($99 per year or $20 per month) . As you can see this isn’t cheap but it is still certainly cheaper than building your own station from nothing.

What you will need

Unfortunately RHR’s documentation about EME isn’t super descriptive. In the process of learning how to use their station I ended up with a setup that is a bit different. I find mine to be more convenient for the simple reason that it doesn’t require you to alter your Mac’s default security settings. Also, you will not need to pay extra $99 in order to purchase a third party program (see below).

This is what you are going to need:

Contrary to what RHR recommends, in my setup you DON’T NEED:

  • Amoeba Loopback ($99)
  • xDAX by DL3LSM

Next Page

Categories
3D Printing Hacks HF Portable

The GAWANT Antenna

After my QRP/Portable QSO with a Japanese station, I was contacted by Hiroshi JL1KLK who asked if he could mention my post in his blog. I obviously consented. In his post Hiroshi shows the similarities between his QRP operations and mine: we both have glasses, we both wear caps, we both are middle aged, we both operate near the water, we both operated standing. There was, however, a difference that stood out: I use an MLA, while he uses a vertical antenna called GAWANT.

Since I always desired a portable vertical I decided to look into it and eventually build my own. But what is the GAWANT? After some research, I found that it is design somewhat popular in Japan.
Technically, it is an half-wave vertical end-fed in a FT817-friendly package. After asking, Hiroshi very kindly provided me all the details with this wonderful document:

Click for more info

In it, I discovered that the original designer, Ariga JF1QHZ, named it after his native Shinagawa-shuku neighborhood.
I already had everything I needed to build it, except of course for the 2 meter long telescopic rod and the case. The former was acquired at buddypole.com for $8.50 and the latter was designed and 3D printed by myself. You can check it out at Thingiverse, if you wish.

The GAWANT is ofter used directly on the front BNC of the FT817. I find this impractical because the rod will come uncomfortably close to the operator’s head, and also because the leverage force expressed on the connector appears to be too much. I prefer attaching it to the rear SO239 connector, by means of a right-angle PL259 to BNC connector. I am not excluding the idea of redesigning the case in order to address this particular usability aspect.

The first test of the antenna was in my backyard (these days it might be better to stay home…) and the results were encouraging: in just a few minutes during the WPX CW contest I made 3 contacts: Texas, Europe and Africa. Not too bad!

Here are some more pictures:

Will I switch from using Magnetic Loops to Vertical end feds during my operable operations? Probably not, still the GAWANT is a very nice – super portable – HF antenna that I now have available. Given the cost of making it (I estimate less than $20) I think everyone should build one!

Many thanks to Hiroshi-san for providing all the information, and to Ariga-san for the design!

Categories
HAB Hacks

K1FM Pico Balloon – Part Two

Great progress with the Pico Balloon project!

The latest release (version 1.3) is 4 layers and weights around 3 grams when printed on a 1.6mm PCB (can further be reduced in the future). It also have some interesting new features: allows self-calibration, can measure its own power supply and has an onboard temperature sensor. Here it is:

Version 1.3 is definitely airworthy and can be used for an actual launch. Schematics and board layout are now available on GitHub: https://github.com/adecarolis/K1FM-Pico-Balloon

On the software side, I might use OrionWspr by Michael Babineau which now supports my board. As an alternative, a simpler version I am developing could also be deployed.

The part I am still wondering about is power. Contrary to my initial understanding, it is, after all, possible to avoid using batteries (or super-capacitors) and power the balloon by solar panels only. That would require somewhat larger panels (probably around 6 or 7 grams) that could generate enough current for the board to run under direct sunlight.
An alternative option is to use lighter panel s (1.5 grams or even less) that feed a power charger which in turn charges a 1.5 Farad (5 grams) super-capacitor. Finally, there is the possibility of using lighter panels which directly drive a capacitor without using any chargers. This raw method seems to be preferred by other balloonists but I still don’t have a solution for it.

We’ll see what happens on my next post.

Categories
Hacks

K1FM WSPR Transmitter (aka: el cheapo Antenna Testing)

I recently built a couple of identical WSPR transmitters to be used in direct comparisons between magnetic loops and other antennas, or even between various kinds of magnetic loops. They are now available on Github.

The transmitters are based upon the Si5351 clock generator and their RF section was inspired by the excellent Zachtec’s products. An onboard GPS receiver is used to automatically provide timing and location. In the absence of a GPS fix a button can be used to start transmitting. The same button can also be used to cycle between 5 predefined WSPR frequencies. There are no onboard filters therefore external filters must be used in order to maintain compliance with FCC rules.
SMA connectors provide connectivity for both the HF and the GPS antennas.

The firmware is based upon existing libraries and was created around version 1.0 of the board. Version 1.1 introduces an important extra feature: auto-calibration.

I also built another magnetic loop, identical to the one I already have. Together, they will serve as a testbed for my comparison tests.